
17 Jun From Auto to Manual | DSLR Tutorials and Tips | Part 1: Aperture
Joyce told us that she gets lots of questions from her clients on how to take better pictures of their children in between professional photography sessions. She wrote this great article to help the parents with DSLR cameras learn more about how to get better pictures from learning to use the Manual Mode:
Taking Control: From Auto to Manual
Taking Control: From Auto to Manual is a new series for those of you who are looking to “photography freedom”. By learning the Manual Mode (M) on your camera, you are in the driver seat, taking full control on exactly how your images will come out. I will show you step by step how you can get the best possible photos from your digital SLR camera. Follow me for the next few weeks to learn the ins and outs of manual mode.
Exposure Triangle
Photography is all about light! It’s about how much light is entering your camera to create the “proper” exposure for your photographs. Three factors inter-related in getting proper exposure and you might have heard the name, Exposure Triangle. And they are:
- Aperture
- Shutter Speed
- ISO
These factors work together in different combinations to give you the correct exposure by controlling how much light is let in into your camera. We will cover each element in the exposure triangle so you can get the best grasp of the basics, to set a firm foundation to start taking control of our digital photos.
Aperture:
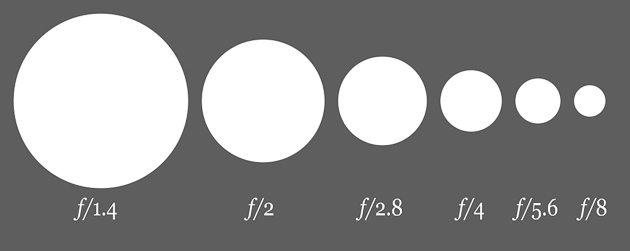
Aperture (or f-stop) is the size of the lens opening when the picture was taken. The smaller the number, the larger the opening thus more light is let in, and vice versa. Aperture is like the pupil of your eyes. When the light is dim, your pupil opens up to let more light in; and when the light is bright, your pupil contracts to let less light in.

Depth of Field + Focus Plane
By changing the size of your aperture, many things will happen. One of them is Depth of Field or DOF. Depth of Field is the distance between the nearest and farthest objects in a scene that will appear focused in an image. A large DOF means more will be focused in a scene of your image whether it’s closer or farther away from your camera. A shallow (small) DOF means only small amount in a scene of your image will be in focus. The DOF is affected by the size of your focal plane which is controlled by the size of the aperture. The larger the aperture (f/1.8), the thinner is the focus plane. The smaller the aperture (f/22), the thicker is the focus plane.
Think of focus plane is like a hardback bound book, standing upright on a table. At F/1.8, the focus plane is very thin (like a children’s book, such as Dr. Seuss’s ABC). The only part that will be in focus are what’s between the front and back covers. So at f/1.8, DOF is shallow with less in focus and more blurred. However, in a scene shot at F/22, the focus plane is very thick (think of a reference book, like a large dictionary). The focus plane is a lot thicker so you will have a large DOF where most of the scene will be in focus and less blurred.
In the following examples, I used aperture of 2.8, 5.6 and 11 to show you the “thickness” of the focus plane at different aperture settings. For the purpose of the demonstration, I placed my center focus point on line 12.
Shot at Aperture setting F2.8
You can see the Focus Plane is very thin. There are only 2 lines are in focus so the DOF is very shallow, meaning most of the image is blurred.

Shot at Aperture Setting F5.6
You can see the Focus Plane is getting larger compare to F2.8, where now there are more lines in focus. DOF is getting larger with F5.6.

Shot at Aperture Setting F11
The focus plane is obviously larger compare to F2.8. Now this image has more scene that are in focus. The DOF is significantly larger than at F2.8.

As you can see, Aperture size is how to achieve the blurred background we all love. By shooting a subject at a shallow Depth of Field such as F2.8, our subject will be clear and sharp while the background is blurred. This is best used when you want to isolate a subject from the background elements. However, keep in mind that since f2.8 has shallow focus plane, it requires much practice to get perfectly sharp images.
Tip: Analyze the subject of your scene and select the BEST aperture setting for it. For example, if your subject is moving, F8 and above might be your best bet since focus plane is thicker. If your subject is non-moving such as a sleeping child, F4 or F5.6 might be a good choice.
For more great tips for going Auto to Manual, check out Joyce around the web!
11 Comments