
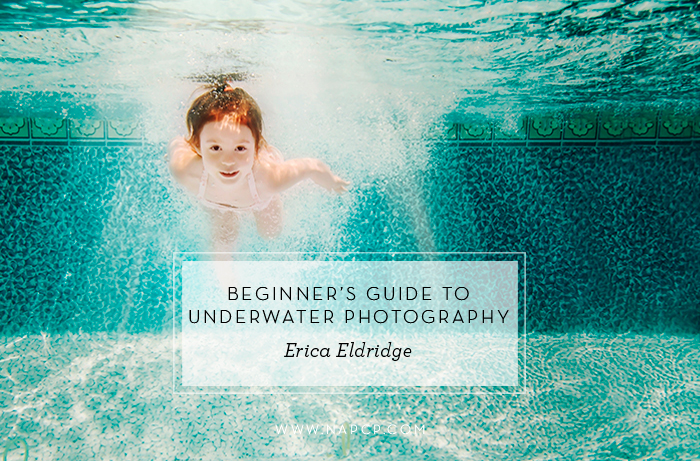
27 Jul Beginner's Guide to Underwater Photography
I recently got into this, and it is so fun and addictive! I feel like a lot of us dry land photographers are overwhelmed by the thought of this but it doesn’t have to be scary! Here is a step by step guide to getting started, from gear to editing.
Gear
There are a lot of options here. And you can drop a lot of dough. But you don’t have to. When I started researching underwater houses for my Nikon D800, the one that came up most often and seemed like the best reviewed is the Ikelite. They make housings for Nikon, Canon and more, and this is what I would have gotten:
Ikelite Underwater Housing for D800
This is an obviously expensive option. When you are talking about protecting your “baby”, expensive is probably a good thing. Based on my research …
PROS: Least cumbersome of underwater housing models and easy to use. Easy access to your camera’s settings buttons. TTL or “Through-The-Lens” flash metering for proper exposure. Easy viewing and metering. Easy grip and handling. Easy lens zooming. Amazing quality images.
CONS: Really just the price here.
The price for me was a non-starter. I had no idea if I would even enjoy underwater photography! Another popular and well reviewed option was this one:
EWA Marine Underwater Housing
This is the one I went with after extensive research. THE MOST IMPORTANT thing for me was that it didn’t leak and this one passed with flying colors in that regard. There are lots of cons though:
PROS: Low cost, no leakage, lightweight and easy to travel with, fits most larger DSLR cameras. It is very functional and does what it says. It’s easy to load and unload once you know what you are doing, and the images are unaffected by the plastic and pretty amazing.
CONS: Cumbersome to use – it’s really just a plastic bag, so it’s difficult to access and adjust camera settings. There is a groove for your finger to adjust camera functions, but it is not easy to use. Again, it’s plastic, so it’s not as durable. The lens must be flush up against the lens house, so you need to make sure you have the correct adapter. It is difficult to see through the view finder. It is difficult to zoom within the housing. It is buoyant, so it is difficult to hold underwater. It’s best for shallow photography.
Yet another option, the cheapest and most safe, is to buy an underwater digital camera like this one:
Olympus Stylus TOUGH
PROS: Pre-designated underwater settings. This is a biggie! Your images don’t come out with blue skinned smurfs! No cumbersome housings. No worries about leaking or ruining an expensive camera. Easy to travel with, light, small.
CONS: It’s not a DSLR. The images are not as spectacular and you lose control over many DSLR functions that would be helpful underwater, such as continuous shooting mode (this is a huge CON for me).
So there you have it. I went with the EWA housing and couldn’t be happier. It’s not the easiest to use, but the images are still amazing. So now what?
Shooting Tips
– I recommend shooting in continuous shooting mode, particularly if you are capturing an action shot. Underwater, most subjects are moving, so this is your best bet.
– Try to get pretty close to your subject. Water tends to dull the contrast and sharpness of your image.
– If you are using natural light (like I do!) try to shoot closer to mid-day than you typically would, so the light filters into the water and to your subject. You can get some nice light rays diffusing through the water in the right conditions.
– Use a high shutter speed for high contrast/sharpness and to capture action.
– Get creative! Some of my favorite shots are split captures, with the camera half in the water and half out. This is a very simple trick to master.
– This is a no-brainer, but the clearer the water, the better for image quality.
– Don’t forget about composition. Negative space can look beautiful underwater and add a sense of depth. Look for where light is reflecting – maybe in interesting patterns off the bottom of a pool, or if you have bubbles you can get some pretty cool bubble bokeh.
– Shoot in RAW. It will make post processing white balance and color temperature corrections so much easier.
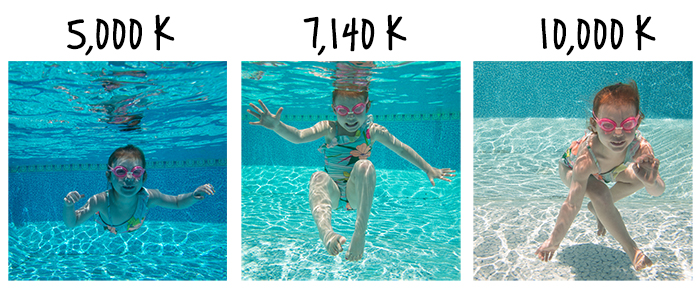
– Get your settings as accurate as possible for underwater shooting. You want the lowest ISO possible for a reasonable shooting speed (fast is good here) and you also want to adjust your white balance/color temperature for underwater conditions. A good starting point is 9,000 K (kelvin) but will depend on your conditions and the sun. Your best bet is to use a grey card underwater.
This is an example of how much setting your white balance can help your image. 5,000 K is the temperature you would use during the daytime for proper exposure of subjects (out of the water!):
Editing
Probably the most daunting aspect of underwater photography is editing. The images have a blue tint that takes some work to correct on skin. So here are some tips to help. If you get your settings right, the less you will have to correct in post-processing, but I have “fixed” the most atrocious images, so it can be done! Some basic steps:
– Try to shoot in RAW so that you have more control with post fixes.
– Your first step is to correct skin as much as possible in Lightroom or Adobe Camera Raw before importing to Photoshop. I use Adobe Camera Raw, but the same principles apply to Lightroom. You’re going to want to take the blue and green down significantly.
– Run any presets here. I typically use a VSCO preset.
– Up your contrast and clarity.
– Import image into Photoshop.
– The first thing I do in Photoshop is fix the skin. I use brushes with masks and layers to selectively correct the skin tone and brighten up the exposure. Some rules of thumb using CMYK curves (these are starting points, and will vary):
Caucasian skin:
Cyan = 1/4 – 1/3 Yellow
Magenta + (0-10) = Yellow
Black values ~ 0
African American skin:
Cyan = 1/3 – 1/2+ Yellow
Magenta + (0-10) = Yellow
Black (K) values higher than 0
– After I fix the skin, I up the contrast more and A LOT. I also play around with tone curves to get the most out of contrast adjustments (try upping whites and reducing blacks). This adds more depth that is often lost underwater.
– I start with my creative edits. I might deepen the color of the water by increasing saturation of blues or greens, or selectively bringing down the exposure around the subject. I sometimes enhance any light sources that are there with brushes and masks. If I have a split image, I might enhance the curve of a wave using the Liquify tool. Have fun with it!
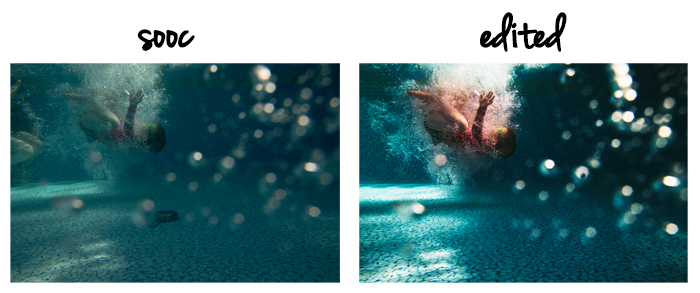
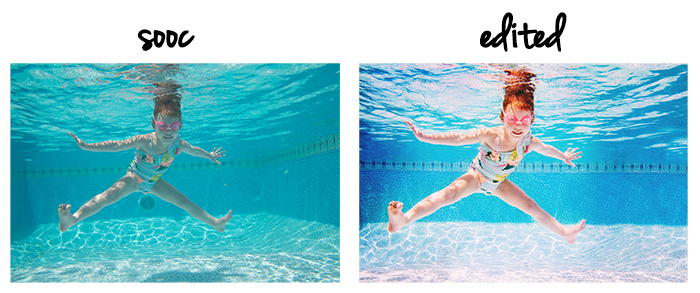
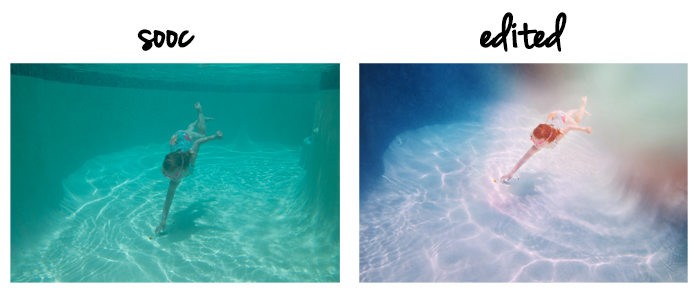
Some fun Before and Afters:
Tag your underwater images using #napcp on Instagram!
Enter your underwater image in the NAPCP International Image Competition, open through August 18th, 2016!
2 Comments