
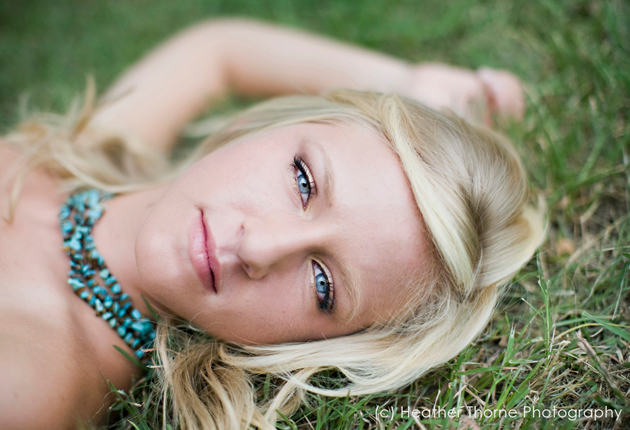
29 Nov A Photo-Shoot Ready Face

So you’ve booked a photographer, planned your outfit and location and can’t wait to have a collection of memories adorning your home. But what you may not have thought about was your makeup. I understand, you want to keep it natural. After all, this isn’t your bridal portrait session. Why bother? But you really should.
Whether you are a high school senior, a new mommy-to-be or a mother of three preparing for your photo shoot, your makeup shouldn’t be an after-thought. It’s become something I’m passionate about sharing with my own clients because I’ve seen the remarkable difference it can make in their photographs.
As a self-proclaimed beauty junkie I want to let you in on the secrets of a photo shoot- ready face. And whether you apply it yourself or splurge on a pro, I’ve done the research so you don’t have to.


The Pro:
My personal recommendation (for high school seniors in particular) is to go with a pro. I recently sat down with professional makeup artist extraordinaire Sabrina Hull of Sambri Salon and Spa to get the scoop on her specialty—the airbrush technique. Sabrina has worked with numerous photographers (including yours truly) and clients on a variety of weddings, commercial and personal shoots and being so impressed with her art form, I wanted to shine a light on this option and why it’s so great for photo shoots.
What a professional like Sabrina can offer is the ability to perfectly match your foundation to your skin tone, something she says is often over-looked in self application. “Women tend to go too light or too dark,” she said, adding that your shoot location also plays a factor in how your makeup artist will apply. “If your session is indoors using flash, your skin tone changes and you might need a shade that’s a touch darker or you’ll look washed out.” And we all know that having a washed out face while the rest of you is a shade darker is not a good look. (Side note: This can also be an editing nightmare for your photographer and could cost you additional fees for the touchup work involved.)
The airbrush technique Sabrina uses is water-based and applied evenly via a fine mist. “The formula works well for photo shoots because it doesn’t bounce the light from the flash back (which gives an unflattering white or lighter cast to the face) and it won’t mix with the oils in your skin, thereby changing the color of your foundation,” she said. It’s also sweat/waterproof for up to 24 hours ensuring your makeup won’t run or smudge throughout the duration of your shoot.
Another benefit to hiring a pro is that they are able to select eye, cheek, and lip colors that compliment your hair, eye, and skin coloring. Sabrina said it’s never a good idea to match your eye shadow or lip color to your clothing and to stay away from shimmer. “I tend to go close to a person’s natural lip color,” she said adding that she’s able to achieve that even with priming and lining the lips for more staying power.
A pro also uses the appropriate tools (that sponge-tip applicator that came with your eye shadow palette? Toss it. You need a decent eye shadow brush instead.) They are also able to apply your custom eye shadow palette appropriately based on your eye and brow shapes. At this point in our conversation, I had to know just exactly how Sabrina would have done my eyes to which she sweetly responded, “Your eyes are a tiny bit close-set so I would definitely apply your darker color further out, drawing the eyes apart just a bit.” Who knew?
If looking “made up” is your concern with a pro application, fret no more. “A good artist is only going to enhance you, not change you,” said Sabrina.


Self-Application:
If you plan on applying your own makeup for your photo shoot, I’ve compiled a list of tips and products based on my own research to help you achieve a look both you and your photographer will be proud of. I, by no means, am saying these are the only products to use or that they work for everyone, but maybe they’ll inspire you to experiment or find something comparable that does work for you.
First and foremost, whether applying yourself or working with a pro, it’s important to start with a clean (i.e. exfoliated/moisturized) face. You’ll also want to apply makeup in natural light so grab a mirror and get near a bright window.
Secondly, a good primer will provide a smooth canvas for makeup by concealing fine lines, large pores and uneven skin texture. Smashbox Photo Finish Foundation Primer (Sephora), Makeup For Ever’s HD Microperfecting Primer (Sephora) and L’Oreal’s Studio Secrets Professional Secret No.1 Magic Perfecting Base all create a beautiful canvas to build on.
Once your face is prepped, foundation is key. And that mineral makeup that looks gorgeous for every day wear and is so good for your skin? Don’t even think about using it for your photo shoot. Sabrina explained that most of it has a light shimmer that doesn’t translate well on camera. “It can look wet and draw attention to fine lines and imperfections” she said. I don’t know about you, but I definitely don’t need that. You’ll also want to make sure your foundation doesn’t have SPF in it as that can cause a white cast on the face. Revlon’s Photoready Makeup or Colorstay Makeup are great drugstore options while Makeup For Ever’s HD Invisible Cover Foundation and Smashbox’s High Definition Healthy FX foundation are good higher-end options, both of which can be found at Sephora. When applying, remember it’s best to stipple (gently apply in short strokes versus wiping) foundation with a special brush or damp sponge rather than using your finger.
For eyes, it’s pretty simple. Use color to enhance, not overpower. Sabrina suggested subtle (and blended) shades of lavender, copper or green for brown-eyed beauties and lavender/purples for green eyes. Again, you’ll want to avoid shimmer and stick to matte shades. She recommended yellow or orange toned colors for hazel eyes to bring out the green in them. Blue-eyed gals can be thankful they can wear just about any color, according to Sabrina. However, if you tend to have dark circles under your eyes, she advises you stay away from purple or blue hues to avoid a black-eye look. Revlon’s Colorstay shadows and Make Up For Ever Eyeshadow palettes provide long-lasting color. Also, and this is very important, don’t forget to prime your eyelids to avoid fading/slipping. NP Set Eye Primer (available at Target) and Smashbox’s Photo Finish Lid Primer (Sephora) are excellent counterparts to your shadow. When lining your eyes, Sabrina suggested you avoid lining the inner rim of your lower lash line. While it might look good in person, it makes your eyes appear smaller on camera. Same goes for heavily lined eyes top to bottom or attempting that smoky eye. While it might be glamorous or dramatic in person, it can look flat on camera and make your eyes seem much smaller or hollow. Gel liners like Bobbi Brown’s Long-Wear Gel Eyeliner (Sephora) and Maybelline’s Eye Studio Lasting Drama Gel Eyeliner are smudge- proof and easy to apply. I recommend getting a good eyeliner brush as well. Prefer a pencil? Aqua Eyes by Make Up For Ever (Sephora) or Revlon Colorstay eyeliner won’t budge throughout your shoot. Don’t forget to apply waterproof black mascara after you’ve lined the upper and lower lash lines. You’ll want to make sure it’s a fairly new tube to avoid dry, cakey chunks. Cleaning your lashes off with a lash brush after you’ve applied shadow (and before you apply mascara) also ensures a neater look.


Lip and Cheek color are also important and I often find that young women are hesitant to wear it. I’ll admit, I avoided blush long into my 20s for fear I’d apply it wrong and look like a clown. A pro will help tailor a more natural look for you (as well as shade and define your features appropriately) but if you try it yourself (and a punch of cheek color definitely looks great in photos!), Sabrina recommended you apply the darkest part of your blush on the apples of your cheeks and shade upward. Again, a good fluffy brush and a non-shimmery product are important.
Sabrina prefers a more natural lip but it’s ok to use color as long as you’re not trying to coordinate with clothing. Priming the lips (you can use your face primer or a little foundation) gives staying power and she also recommends lining them with a pencil close to your natural lip color. (I’m a personal fan of MAC’s lip pencil in “spice” (Nordstrom) which I use to fill in the entire lip. Although beautiful in person, lip gloss should be used sparingly on camera. Sabrina recommends a matte lip color but if you want to add gloss, only apply to the middle of the bottom lip to create volume. A couple of lip color options that have staying power include CoverGirl Outlast Lip Stain and Stila’s Longwear Lip Color and Liquid Lip Color (Sephora).
A quick tip I’d never thought about? Clean up your brows after applying makeup since particles can settle into the hairs and cause a “fuzzy” or soft look. You can do this by taking a clean eyebrow brush and gently brushing through each brow. You may also want to fill them in with a brow powder. Sabrina strongly recommends paying close attention to often-overlooked brows because they frame your face — pretty important in photographs.
After you’ve created your masterpiece, you’ll want to “set” the look with a good translucent loose powder and appropriate brush. Careful though, the wrong kind of powder can make you look pasty. Sabrina recommended Laura Mercier’s Loose Setting Powder in translucent for all skin tones (Sephora). Other good ones to try include Tarte’s colorless, mattifying Smooth Operator Micronized Clay Finishing Powder (Sephora) and It Cosmetics Bye Bye Pores HD Silk Micro-Powder (beauty.com).
Last but not least, the right tools will help you achieve a flawless look. I’ve hinted at the importance of makeup brushes throughout this article (again, you want to avoid most of the applicators that come with the packaging) and you don’t have to spend a fortune to get great tools. Sonia Kashuk for Target and Sephora’s line of makeup brushes are affordable options that do the trick.
Be sure to bring your powder and/or blotting papers and lip color along for touch-ups during your shoot and Sabrina and I both recommend practicing your self-application prior to your shoot at least once. Go ahead and get your camera out and have someone photograph you in natural light and with a flash to get an idea of where you stand. Were you a bit heavy-handed on one eye? Could your brows use a fresh waxing? Is your foundation the wrong color? I know these are extra steps that take time but you are investing in beautiful memories you’ll cherish forever. I promise you, it will be worth it. And as Sabrina so matter-of-factly stated during the course of our chat (and I couldn’t agree more), “Wouldn’t you rather have a lot of good shots to choose from versus just a few heavily edited ones?” I’m thinking
yes…. and secretly about my next makeup purchase. 😉